Multi-Contact MA265 Manuel d'utilisation
Page 4
Advanced Contact Technology
Advanced Contact Technology
6 / 16 www.multi-contact.com
www.multi-contact.com
7 / 16
7
8
Installation de l’outil auxiliaire
PV-JB-WZ LC SP
Setting up the auxiliary tool
PV-JB-WZ LC SP
Remarque:
S’assurer que l’outil de pression est entretenu régulièrement
et vérifier la pression exercée
.
Note:
Please make sure the pressing-on tool is maintained on a
regular basis and check the pressing-on pressure.
En fin de chapitre, vous trouverez des instructions sur
la manière de placer le boîtier de raccordement sans
outil auxiliaire
There are instructions on fitting the junction box
withou t the auxiliary tool at the end of this chapter.
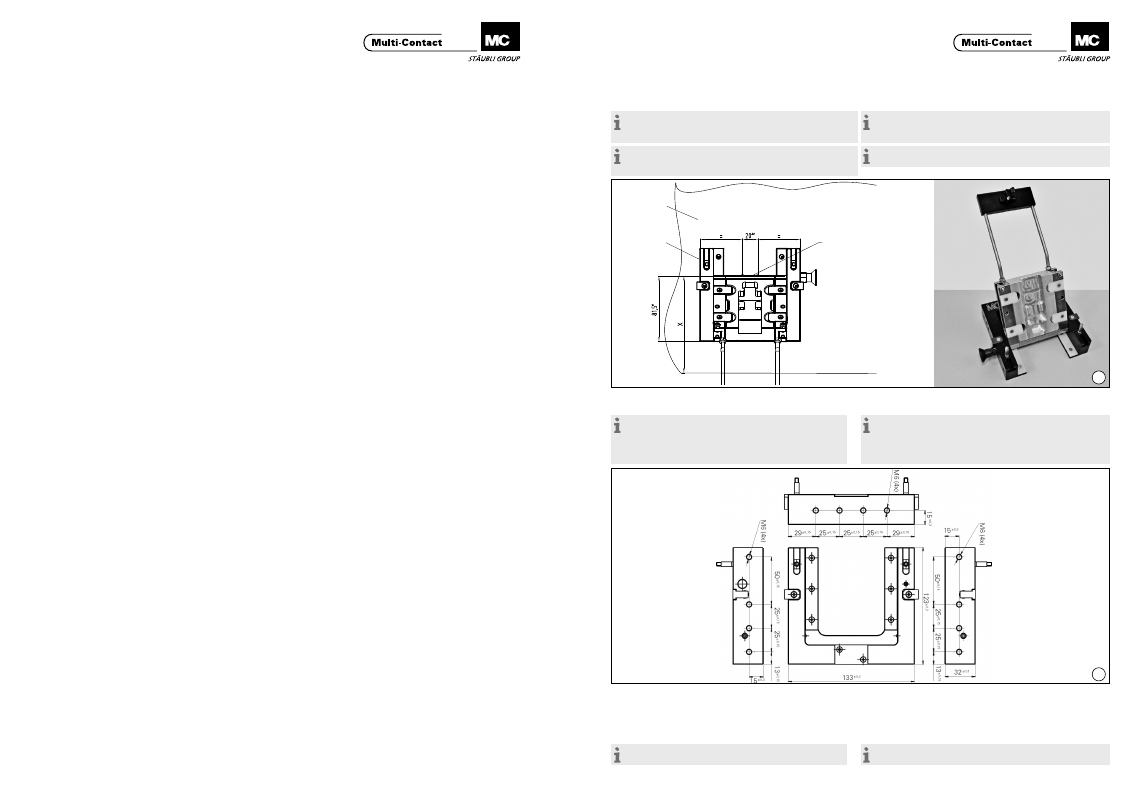
(ill. 7)
Poser l’outil de montage sur le module et le mettre en position�
(ill. 7)
Place assembly tool on the module and bring into position�
Remarque:
La distance “X” entre la sortie des bandes de contact et le
bord extérieur du module PV doit être d’au moins 50 mm.
La distance entre la sortie des bandes de contact et le bord
de l’outil de montage doit être au moins égale à 81,5±1 mm.
Note:
The distance “X” between the contact ribbon outlet and the
outer edge of the PV module must be at least 50 mm.
The distance between the contact ribbon outlet and the edge of
the assembly tool must be 81,5±1 mm.
(ill. 8)
La fixation de l’outil auxiliaire s’effectue au moyen d’élé-
ments de fixation appropriés comme p.ex. des cornières,
etc. qui peuvent être fixés (selon les conditions) aux trous de
fixation disposés sur les 3 côtés.
(ill. 8)
The auxiliary tool is fixed by suitable retaining elements such as
angle irons etc. which can be fixed in different ways (according
to the situation) to the fastening holes provided on three sides�
Remarque:
les éléments de fixation ne sont pas fournis.
Note:
Retaining elements not supplied.
Module PV
PV module
Outil auxiliaire
Auxiliary tool
PV-JB-WZ LC SP
Trou de sortie de la bande de contact
Exit hole for contact ribbon
Apprêt de silane pour verre 3M
• La température de travail recommandée de l’apprêt et du
matériel est comprise entre +15 °C et +25 °C.
• Bien agiter l’apprêt avant de s’en servir�
• Humecter un chiffon jetable non pelucheux avec de l’apprêt
de silane pour verre�
• Appliquer l’apprêt de silane pour verre en couches très fines
sur la surface du verre à coller, en un mouvement circulaire à
360° aussi constant que possible autour des conducteurs.
• Important : l’apprêt doit impérativement être appliqué
en couches très fines (couche monomoléculaire).
• Important : enlever immédiatement avec un chiffon
neuf et après l’application le film séché d’apprêt de silane
d’apparence laiteuse� Essuyer en effectuant une rotation
dans la même direction que pour l’application de l’apprêt�
• Ne PAS toucher la surface apprêtée en verre avec les doigts
nus avant l’application de la bande adhésive�
• Aucune traînée arc-en-ciel ne doit être visible sur la surface
apprêtée en verre� Si tel est le cas, l’apprêt a été appliqué
en couches trop épaisses� L’enlever avec de l’isopropanol et
répéter l’application�
• La boîte de raccordement peut être fixée au module, au plus
tard 5 minutes après l’application de l’apprêt�
• S’assurer qu’aucune salissure ou humidité ne se forme à la
surface entre l’apprêt et l’application de la boîte de raccorde-
ment�
• Respecter également les notices de traitement du fabricant
d’apprêt�
3M Silane Glass Primer
• The recommended working temperature for the primer and
material is between +15 °C and +25 °C.
• Shake primer well before use
• Moisten a lint-free disposable cloth with Silane glass primer�
• Apply Silane glass primer very thinly to the bonding surface
of the glass, in as continuous as possible a 360° movement
around the connecting ribbons�
• Important: The primer must really be applied extremely
thinly (monomolecular layer).
• Important: Using a new cloth, remove the milky-looking
dried film of Silane primer, without delay after application.
Wipe in the same rotation direction as when applying the
primer�
• Do NOT touch the primered glass surface with the bare
fingers before applying the adhesive tape.
• No rainbow-like streaks must be visible on the primered
glass surface� If this is the case, the primer has been applied
too thickly� Remove with isopropanol and repeat the applica-
tion�
• Fix the junction box on the module not more than 5 minutes
after applying the primer�
• Make sure that neither soiling nor moisture develops on
the surface between primering and the application of the
junction box�
• Also observe the processing instructions of the primer ma-
nufacturer�
Apprêt 3M 94 ou apprêt 3M 4298 UV sur Tedlar®
• La température de travail recommandée de l’apprêt et du
matériel est comprise entre +15 °C et +25 °C.
• Bien agiter l’apprêt avant de s’en servir�
• Appliquer l’apprêt en une couche aussi fine que possi-
ble, ce qui réduit le temps nécessaire mis par le solvant
à s’évaporer� L’apprêt peut être appliqué au moyen d’un
chiffon jetable non pelucheux, d’une brosse à rouleau, par
vaporisation ou au moyen d’un applicateur�
3M Primer 94 and 3M Primer 4298 UV on tedlar
• The recommended working temperature for the primer and
material is between +15 °C and +25 °C.
• Shake primer well before use
• Apply the primer in as thin a layer as possible. This shortens
the time needed for the solvent to evaporate� You can apply
the primer with a lint-free disposable cloth, a roller brush, by
spraying or with an applicator�
Important : n’appliquer l’apprêt qu’une seule fois.
Important: Apply primer only once.
• Laisser le solvant s’évaporer en aérant pendant une période
dépendant de la température, de l’humidité ambiante, de la
circulation de l’air et de la porosité des surfaces�
• Nous conseillons un temps de séchage de :
– environ 5 minutes pour l’apprêt 94
– environ 30 à 90 secondes pour l’apprêt 4298 UV
• Il est possible d’accélérer considérablement l’évaporation
du solvant en augmentant le flux d’air sur la surface
d’application au moyen d’une soufflerie (réglée à une
température comprise entre 20 °C et 40 °C). Les temps
d’évaporation peuvent être ramenés à environ 10 secondes
avec un mince revêtement d’apprêt et une bonne circulation
d’air�
• Allow the solvent to evaporate by airing for a time which de-
pends on temperature, atmospheric humidity, air circulation
and the porosity of the surfaces�
• We recommend an airing time of:
– approx. 5 minutes for Primer 94
– 30-90 seconds for Primer 4298 UV
• You can substantially speed the evaporation of the solvent
by increasing the flow of air over the application surface by
means of a blower (with a temperature between 20 °C and
40 °C). With a thin primer coating and a good air flow, the
evaporation times can be reduced to as little as around 10
seconds�
Important : s’assurer que le solvant s’est intégralement
évaporé.
Important: Make certain that the solvent has completely
evaporated.