Multi-Contact MA023 Manuel d'utilisation
Page 4
Advanced Contact Technology
4 / 8
www.multi-contact.com
10
11
12
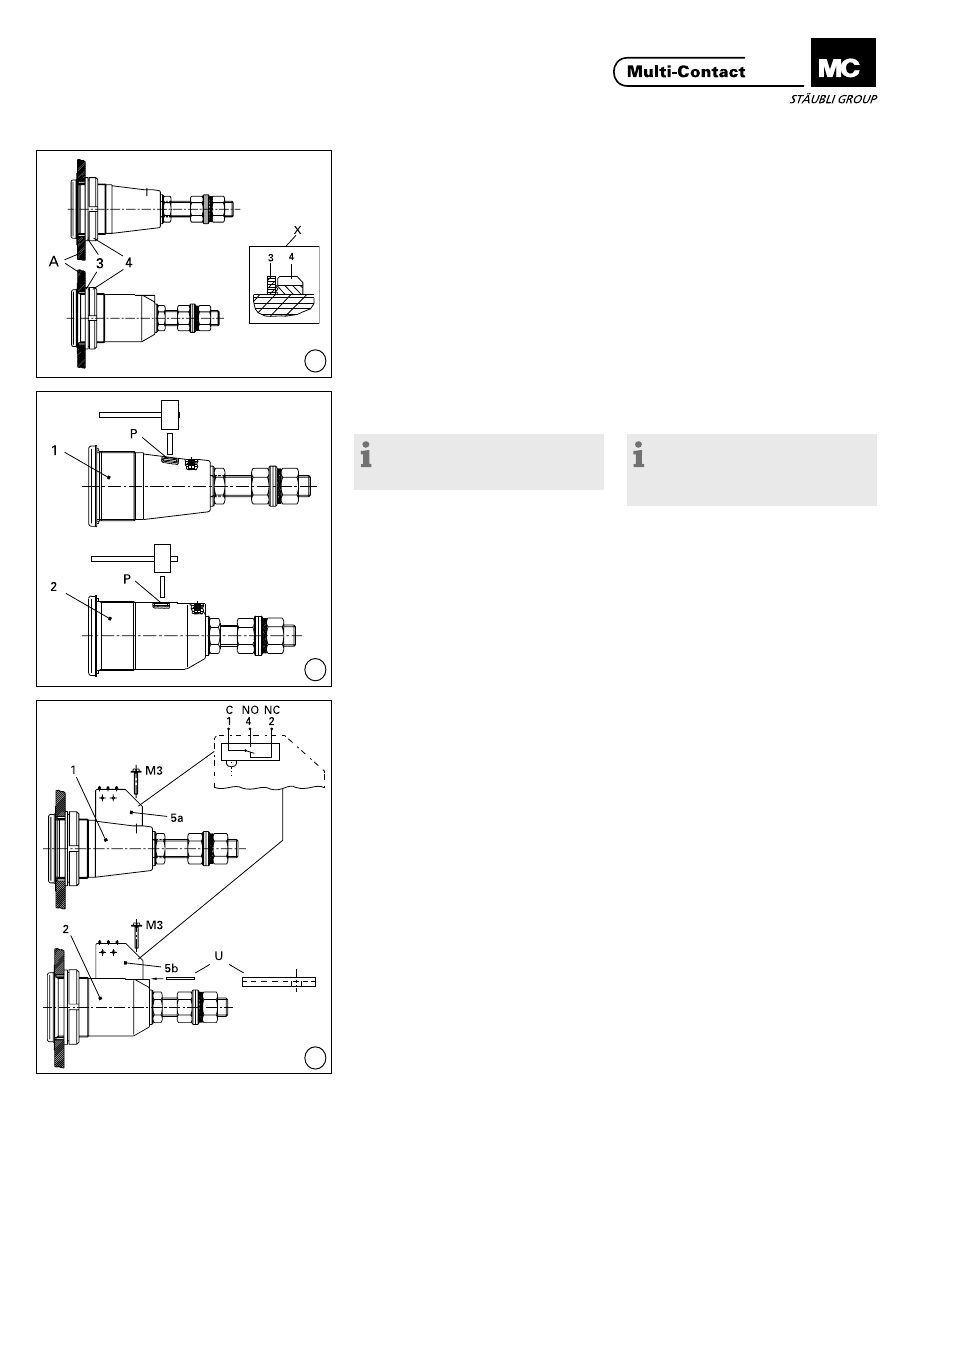
(ill. 10)
Monter la bague en PUR (3) et l‘écrou
cylindrique (4)� Veiller à orienter les
stries de l‘écrou cylindrique vers la
bague en PUR (voir le dessin de detail
X)� Serrer l‘écrou cylindrique avec la
clй а pipe et la clé dynamométrique�
Couple de serrage: 15Nm�
(ill. 10)
Mount the PUR ring (3) and the ring
nut (4). Arrange the grooves of the
ring nut toward the PUR-ring (see
detail drawing X)� Tighten the ring
nut with MC-socket wrench and with
torque spanner� Tightening torque:
15Nm�
2. Montage du couvercle de
protection
2. Protective cover assembly
voir l’instruction de montage MA036.
see separate assembly instruction
MA036.
3. Montage du micro-rupteur
3. Installation of microswitch
Remarque:
Avec le micro-rupteur monté,
l’étanchéité n’est plus garantie..
Note:
With the installated microswitch
the watertightness can not be guar-
anteed.
(ill. 11)
Casser la membrane de protection du
trou débouchant (P) de la douille (1)
ou de la broche (2) à l‘aide d‘un poin-
çon� Veiller à ce qu‘aucun débris ne se
trouve à l‘intérieur de la douille (1) ou
de la broche (2)�
(ill. 11)
Break the protection membrane of the
through-hole (P) of the socket (1) or
plug (2) with a punch� Be careful that
the socket resp� the plug is free from
the broken material�
Avant de fixer le micro-rupteur, la
prise à encastrer doit être monté dans
le panneau (voir ill� 7 jusqu‘à ill� 10)�
Before fastening the microswitch, the
panel receptacle has to be assembled
into the front panel (see ill� 7 to ill� 10)�
(ill. 12)
Fixer le micro-rupteur (5a) sur la
douille (1) avec une vis M3� Pour ce
faire, placer correctement le micro-
rupteur (5a) dans le logement prévu
à cet effet sur la douille (1)� Fixer le
micro-rupteur (5b) avec plaquette de
montage (U) sur la broche (2) avec
une vis M3� Pour ce faire, placer cor-
rectement le micro-rupteur (5b) dans
le logement prévu à cet effet sur la
broche (2)� Il s‘agit d‘un micro-rupteur
inverseur 6A, 250VAC, à trois contacts
2,8x0,5�
(ill. 12)
Fasten microswitch (5a) to socket
(1) with the M3 screw� Firmly insert
the microswitch (5a) in the recess (1)
on the socket and fix in place with
the screw (M3)� Fasten microswitch
(5b) together with mounting plate
(U) to the plug (2)� Fimly insert the
microswitch (5b) in the recess (2)
on the plug and fix in place with the
screw (M3)� The microswitch contact
is a changeover contact� Type of con-
nection: 3 plug connectors 2�8x0�5,
switching capacity 6A, 250VAC.