Kichler 42214 Manuel d'utilisation
Luminaires Kichler
14) Connecter les fils (connecteurs non fournis). Se reporter au tableau ci-d
essous pour faire les connexions.
15) Placer le cache au plafond.
16) Fixer le cache en serrant la bague fileté sur le collier-écrou.
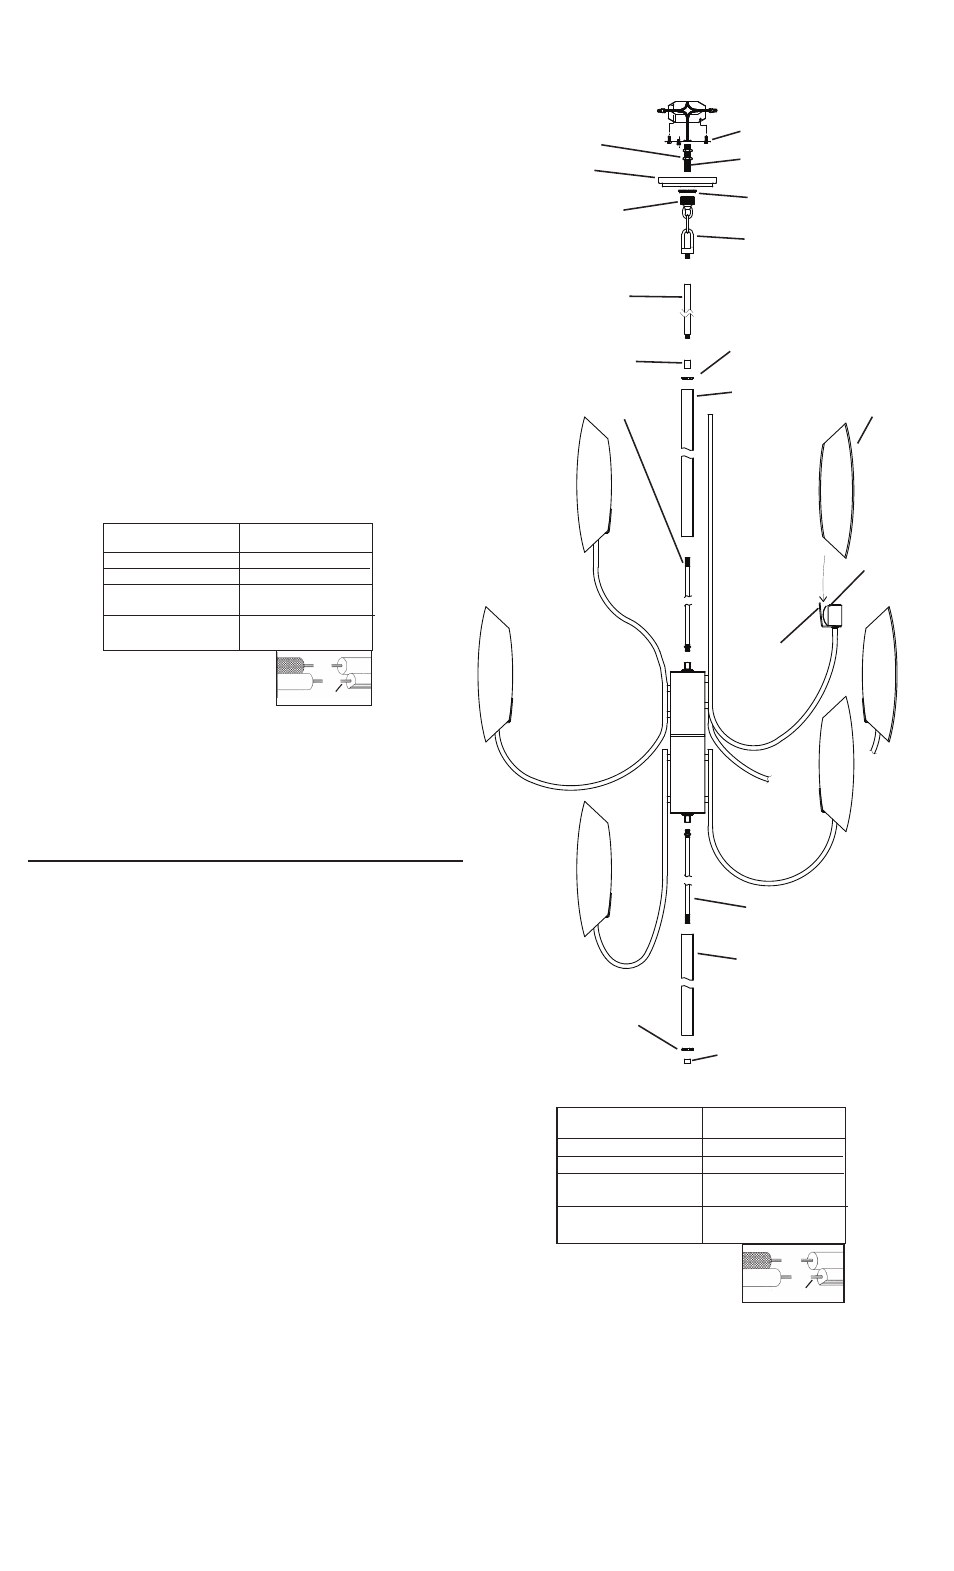
17) Visser l’extrémité du tube fileté le plus court avec l’écrou hexagonal dans
l’accouplement sur l’extrémité inférieure du luminaire.
18) Passer le tube par-dessus le tube fileté.
19) Passer le trou dans l’anneau de retenue sur le tube fileté.
20) Visser l’ornement sur l’extrémité du tube fileté.
21) Introduire l’ampoule recommandée.
22) Placer le verre sur les douilles.
23) Placer le coin du verre entre la barre métallique et le clip.
1) Screw end of long threaded pipe with hexnut into coupling on top of fixture
body.
2) Pass tube down over long threaded pipe.
3) Set check ring then coupling on top of tube.
4) Pass fixture wire through center stem and screw center stem to coupling
on top of fixture body.
IMPORTANT: At least one 12” stem must be used.
NOTE: Thread locking compound must be applied to all stem threads as
noted with symbol (4) to prevent accidental rotation of fixture during cleaning,
relamping, etc.
5) Attach small loop to stem.
6) Turn off power.
7) Take threaded pipe from parts bag and screw into screw collar loop a
minimum of 6 mm (1/4”). Lock into place with hexnut.
8) Run another hexnut down threaded pipe almost touching first hexnut.
Now screw threaded pipe into mounting strap. Mounting strap must be
positioned with extruded thread faced into outlet box. Threaded pipe must
protrude out the back of mounting strap. Connect mounting strap to outlet
box.
9) Unscrew the threaded ring from screw collar loop. Take canopy and pass
over screw collar loop. Approximately one half of the screw collar loop
exterior threads should be exposed. Adjust screw collar loop by turning
assembly up or down in mounting strap. Remove canopy.
10) After desired position is found, tighten top hexnut up against the bottom of
the mounting strap.
11) Slip canopy over screw collar loop and thread on threaded ring. Attach
chain (with fixture connected) to bottom of screw collar loop. Unscrew
threaded ring, let canopy and threaded ring slip down.
12) Weave electrical wire and ground wire through chain links no more than 3
inches apart. Pass wire through threaded ring, canopy, screw collar loop,
threaded pipe and into outlet box.
13) Connect fixture ground wire to outlet box ground wire with wire connector.
(Not provided.) Never connect ground wire to black or
white power supply wire.
14) Make wire connections (connectors not provided.) Reference chart below
for correct connections and wire accordingly.
15) Raise canopy to ceiling.
16) Secure canopy in place by tightening threaded ring onto screw collar loop.
17) Screw end of shorter threaded pipe with hexnut into coupling on bottom of
fixture body.
18) Pass tube up over threaded pipe.
19) Slip hole in check ring over end of threaded pipe.
20) Screw finial onto end of threaded pipe.
21) Insert recommended bulbs.
22) Set glass down over sockets.
23) Fit edge of glass in between metal bar and clip.
1) Visser l’extrémité du long tube fileté avec l’écrou hexagonal dans
l’accouplement sur l’extrémité supérieure du luminaire.
2) Passer le tube sur le long tube fileté.
3) Placer la bague de retenue puis l’accouplement en haut du tube.
4) Acheminer le fil du luminaire par la tige centrale et visser la tige centrale
dans l’accouplement en haut du luminaire.
IMPORTANT: au moins une
tige de 25 cm doit être utilisée.
REMARQUE: Appliquer le frein filet sur tous les filets de la tige indiqués
par le symbole (4) pour empêcher la rotation accidentelle du luminaire
pendant le nettoyage, remplacement de lampe, etc.
5) Attacher la petite boucle à la tige.
6) Couper le courant électrique.
7) Visser le tube fileté (qui se trouve avec les pièces détachées) dans le
collier-écrou, sur une longueur minimum de 6 mm (1/4 po). Fixer avec un
écrou hexagonal.
8) Visser un second écrou hexagonal de manière à ce qu’il touche presque le
premier. Visser ensuite le tube fileté sur la patte de fixation, en le faisant
dépasser et en dirigeant la partie filetée des vis vers la boîte de jonction.
Connecter la patte de fixation à la boîte de jonction.
9) Dévisser la bague filetée du collier-écrou. Passer le cache sur le collier-
écrou. Environ la moitié de filetage extérieur de celui-ci doit être apparent.
Fixer le collier-écrou en faisant pivoter l’assemblage vers le haut ou vers le
bas. Enlever le cache.
10) La bonne position étant trouvée, serrer l’écrou hexagonal supérieur contre
le partie inférieur de la patte de fixation.
11) Glisser le cache sur le collier-écrou et enfiler sur la bague filetée. Attacher
la chaine (avec l’assemblage connecté) au bas du collierécrou. Dévisser la
bague filetée et laisser glisser le cache et la bague filetée.
12) Entrelacer le fil électrque et le fil de mise á la terre et faire passer le tout
dans les anneaux de la chaîne en espaçant au maximum de 3 po. Passer
le fil dans la bague filetée, le cache, le collier-écrou, le tube fileté et la
boîte de jonction.
13) Avec l’attache-fil (qui n’est pas fourni), connecter le fil de mise á la terre au
fil d’alimentation noir ou á celui qui est blanc.
Connect Black or
Red Supply Wire to:
Connect
White Supply Wire to:
Black
White
*Parallel cord (round & smooth)
*Parallel cord (square & ridged)
Clear, Brown, Gold or Black
without tracer
Clear, Brown, Gold or Black
with tracer
Insulated wire (other than green)
with copper conductor
Insulated wire (other than green)
with silver conductor
*Note: When parallel wires (SPT I & SPT II)
are used. The neutral wire is square shaped
or ridged and the other wire will be round in
shape or smooth (see illus.)
Neutral Wire
Date Issued: 2/27/09
IS-42214-CB
3
Connect Black or
Red Supply Wire to:
Connect
White Supply Wire to:
Black
White
*Parallel cord (round & smooth)
*Parallel cord (square & ridged)
Clear, Brown, Gold or Black
without tracer
Clear, Brown, Gold or Black
with tracer
Insulated wire (other than green)
with copper conductor
Insulated wire (other than green)
with silver conductor
*Note: When parallel wires (SPT I & SPT II)
are used. The neutral wire is square shaped
or ridged and the other wire will be round in
shape or smooth (see illus.)
Neutral Wire
CANOPY
ECRAN
GLASS
VERRE
HEXNUT
ECROU HEXAGONAL
MOUNTING STRAP
PATTE DE MONTAGE
THREADED PIPE
TUBE FILETE
INSTRUCTIONS
For Assembling and Installing Fixtures in Canada
Pour L’assemblage et L’installation Au Canada
3
CENTER STEM
TIGE CENTRALE
LONG THREADED
PIPE
LONG TUBE FILETé
TUBE
TUBE
CHECK RING
BAGUE DE
RETENUE
COUPLING
ACCOUPLEMENT
SCREW COLLAR LOOP
COLLIER-éCROU
THREADED RING
BAGUE FILETéE
SMALL LOOP
PETITE BOUCLE
THREADED PIPE
TUBE FILETé
TUBE
TUBE
CHECK RING
BAGUE DE RETENUE
FINIAL
ORNEMENT
CLIP
CLIP
METAL BAR
BARRE
MéTALLIqUE
- 42123 3278 1678 3475 2771 2655 2667 3244 3275 42213 42216 3000 1861 42215 42212 42265 42431 42745 42505 42940 42427 69192 45443 42029 45441 42942 3476 3030 2703 3497 2640 42267 3674 5436 9719 10405 6322 10620 10463 10414 10670 10481 10442 10438 10680 7779 8404 6292 10441 6086 6463 10325 OL5707 OL5708 OL3008 OL3009 8405 7050 OL6007 OL6008 OL3408 OL3407 OL4007 OL5607 OL5608 OL5408 OL5407 OL1908 OL1907 OL1808 6598 5968 6090 10956 9356 9234 9044 9811 6930 10448 9955 9920 9967 10696 9918 10771 10417 6504 9956 10959 10656 10421 9830 9547 9718 9834 2943 6051 9022 10780 9953 6857 9021 6963 9348 9129 9703 10608 10669 9051 6464 11070 11008 11029 10911 9147 9109 10924 10697 9166 10480 10679 9035 11109 10957 10691 9898 9854 11067 9825 9676 9848 9054 9131 9364 10693 10695 10685 9564 9838 9052 9555 1894 2019 1896 10910 10958 9827 2055 2955 10435 10602 10756 9565 7002 10601 6813 10453 10479 10707 10906 10439 10899 11108 10686 10710 10708 10711 10898 10689 9886 9975 11020 11002 11019 9656 3355 3757 2084 42156 42067 42252 2048 49063 3713 3620 45139 42307 45178 49059 5294 5367 2021 2520 11098 10640 10923 11010 9557 10907 11011 10960 10702 2344 9785 10953 9788 9530 9360 9357 10962 9867 42424 3719 1681 10950 10622 10955 10423 11028 11006 10903 11016 43425 43625 5965 5967 1731 3797 42167 49580 42329 42433 3031 15230 15231 15251 15239 49004 15236 49256 15232 42114 42141 3279 49062 42087 3584 3390 2606 43224 1012 2518 3320 2076 2531 2471 15402 1002 15409 1749 43246 43159 43280 43237 43155 1632 2018 3898 2031 2020 10743 2523 3489 43180 1631 43446 43179 1633 43181 43449 43244 43447 42844 43455 43172 43257 43122 43233 42886 2691 3391 43256 2665 2664 2682 66073 3482 3427 42428 45132 3623 42328 1825 43165 42115 42438 43178 42543 43225 43158 42465 2088 49231 2089 43228 43229 3694 42547 42063 69079 5966 43640 3677 43652 42338 43193 49448 49094 43123 42903 42440 43163 43424 3729 42878 5085 45113 45061 43655 45478 43284 43243 42028 3681 43426 11005 43565 3299 42432 42549 43046 42036 42384 5097 42124 43279 43175 2441 42393 2709 65373 42456 43371 43584 42244 43674 43084 43028 42121 2693 42047 42046 42037 43162 42425 42941 42949 42017 4100 45137 43456 43277 42060 42074 42062 49472 43437 42434 65375 43370 42308 42710 43435 43058 42978 43433 42257 43687 43364 43047 49403 42125 43059 43185 65364 42068 43048 43087 42165 43089 42722 42436 43027 65353 42341 43025 43404 42381 43120 43186 2033 42003 65238 42484 43282 3348 49387 42544 42478 42476 2800 42382 2215 3277 2652 49005 43177 43281 3384 43657 43582 43607 65355 42231 43125 42708 43568 43680 42923 42920 42225 42070