Ab c d, Installer les filtres à graisse, Important – haier 24 Inch Over-the-Range Microwave Installation Guide Manuel d'utilisation
Page 46: Aadaptateur, Alampes de surface b porte c filtres à graisse
a
A
Adaptateur
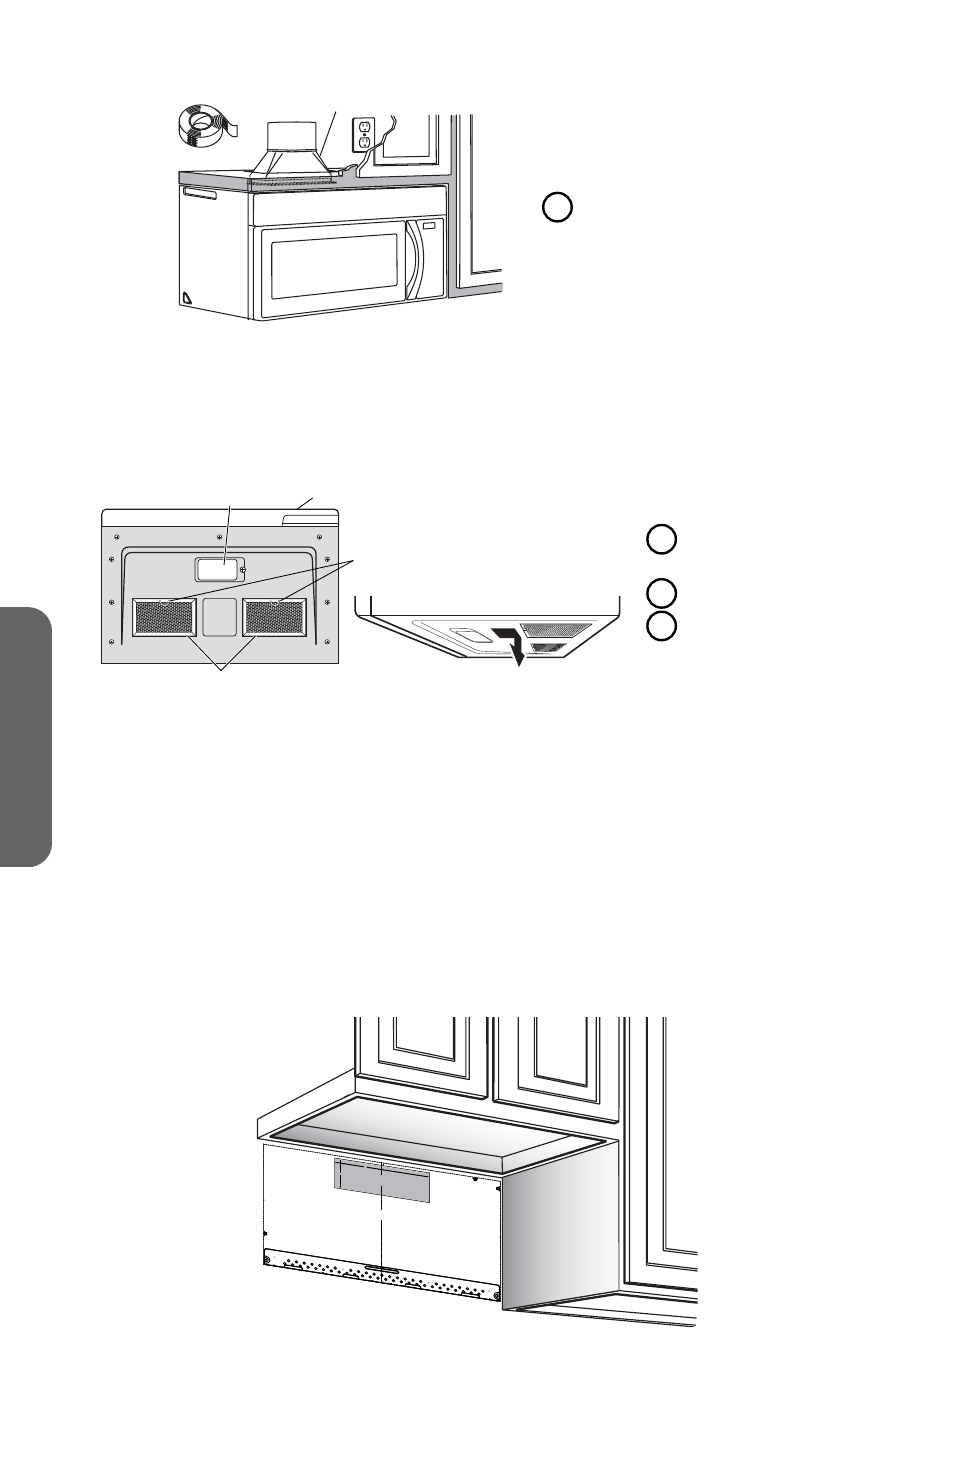
INSTALLER LES FILTRES À GRAISSE
Les filtres à graisse sont situés sur la partie inférieure du four à micro-ondes. Pour
instructions d'installation, voir le manuel d'utilisation livré avec le micro-ondes.
a
b
c
d
A
Lampes de
surface
B
Porte
C
Filtres à graisse
MÉTHODE B - ÉVACUATION EXTÉRIEURE PAR L’ARRIÈRE
(CONDUIT HORIZONTAL)
IMPORTANT :
•
S’assurer que les vis du moteur du ventilateur et du couvercle du ventilateur
sont bien serrées lors de leur réinstallation. Cela évitera des vibrations
excessives.
•
S’assurer que le câblage du moteur a été correctement raccordé et fixé
solidement, et que les câbles ne sont pas coincés.
CRÉER UNE OUVERTURE D'ÉVACUATION SUR LE MUR ARRIÈRE
3/8" TO EDGE
NOTE: IT
IS VERY
IMPORTA
NT TO
READ AND
FOLLOW
THE DIRE
CTIONS
IN THE IN
STALLATI
ON INSTR
UCTION
S
BEFORE
PROCEE
DING WIT
H THIS
REAR WA
LL TEMP
LATE.
This Rear Wal
l Template
serves to pos
ition the bott
om
mounting pl
ate and to lo
cate the hori
zontal exhaust
outlet.
1. Use a lev
el to check
that the tem
plate is po
sitioned
accuratel
y.
2. Locate an
d mark at le
ast one stud
on the left or
right side
of the cente
rline.
It is importan
t to use at le
ast one woo
d
screw mou
nted firmly
in a stud to s
upport the w
eight
of the micro
wave. Mar
k two additio
nal, evenly sp
aced
locations for
the supplie
d toggle bolt
s.
3. Drill holes
in the mark
ed locations
. Where the
re is
a stud, dr
ill a 3/16" ho
le for wood sc
rews. For holes
that do n
ot line up w
ith a stud,
drill 5/8" ho
les for
toggle bol
ts.
DO NOT IN
STALL THE
MOUNTING
PLATE
AT THIS TIM
E.
4. Remove
the template
from the rea
r wall.
5. Review
the Installatio
n Instructio
n book for y
our
installatio
n situation.
Locate an
d mark holes to
align with h
oles in the
mounting p
late.
IMPORTA
NT:
LOCATE
AT LEAST
ONE STU
D ON EITH
ER SIDE O
F
THE CENTE
RLINE.
MARK TH
E LOCATION FOR
2 ADDITIO
NAL, EVE
NLY
SPACED
TOGGLE B
OLTS IN T
HE MO
UNTING PLA
TE
AREA.
Locate and
mark hol
es to align w
ith holes in
the
mounting plate
.
IMPORT
ANT:
LOCATE A
T LEAST
ONE STU
D ON EITH
ER SIDE
OF
THE CENTER
LINE.
MARK TH
E LOCATIO
N FOR 2 AD
DITIONAL
, EVENLY
SPACED TO
GGLE BO
LTS IN THE
MOUNTIN
G PLATE
AREA.
Trim the rea
r wall templa
te along the
dotted
line.
Trim the rea
r wall templa
te along
the dotted
line.
12"
4"
Darle vuelta
a la hoja par
a consultar
la
versión en E
spañol.
1. Lire les instructions sur la plaque de montage/gabarit du mur arrière.
2. Scotcher la plaque de montage/gabarit au mur arrière en l’alignant sur les trous
percés précédemment pour les trous A et B dans la plaque murale.
44
FRANÇAIS