Ab c d, Method b - outside back exhaust (horizontal duct), Install grease filters – haier 24 Inch Over-the-Range Microwave Installation Guide Manuel d'utilisation
Page 18: Important, Create rear wall exhaust opening, Remove the blower plate, Asurface lights b door c grease filters
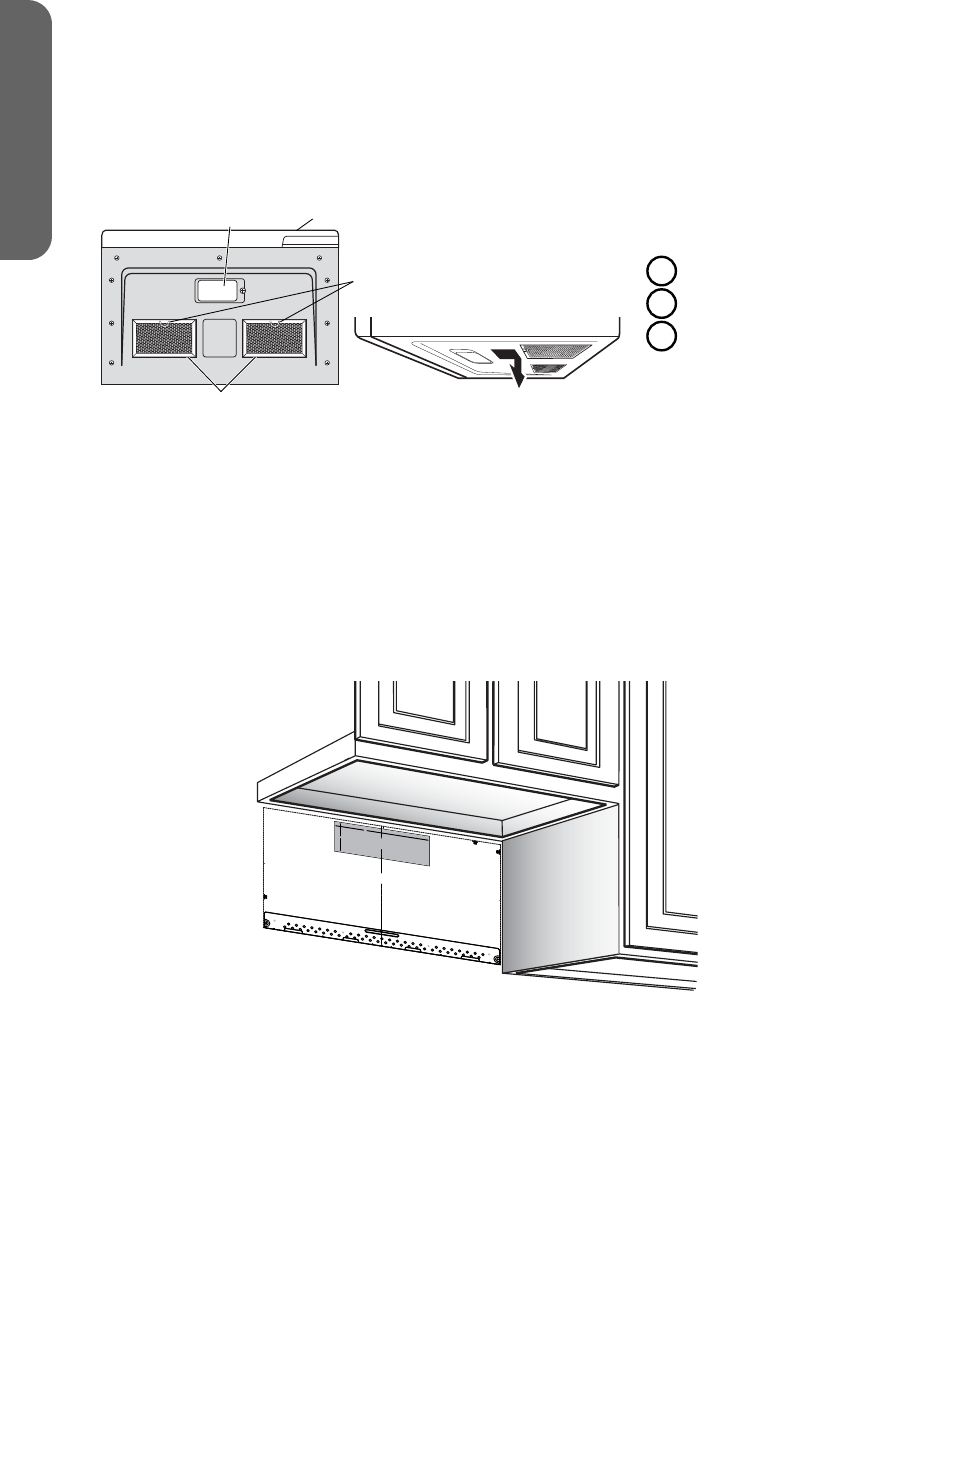
INSTALL GREASE FILTERS
Grease filters are located on the underside of microwave oven. For
installation instructions, see the User Manual packed with the microwave.
a
b
c
d
A
Surface Lights
B
Door
C
Grease Filters
METHOD B - OUTSIDE BACK EXHAUST (HORIZONTAL DUCT)
IMPORTANT:
•
Make sure the screws for the blower motor and blower plate are securely
tightened when they are reinstalled. This will help avoid excessive vibration.
•
Make sure the motor wiring has been properly routed and secured, and that
the wires are not pinched.
CREATE REAR WALL EXHAUST OPENING
3/8" TO EDGE
NOTE: IT
IS VERY
IMPORTA
NT TO
READ AND
FOLLOW
THE DIRE
CTIONS
IN THE IN
STALLATI
ON INSTR
UCTION
S
BEFORE
PROCEE
DING WIT
H THIS
REAR WA
LL TEMP
LATE.
This Rear Wal
l Template
serves to pos
ition the bott
om
mounting pl
ate and to lo
cate the hori
zontal exhaust
outlet.
1. Use a lev
el to check
that the tem
plate is po
sitioned
accuratel
y.
2. Locate an
d mark at le
ast one stud
on the left or
right side
of the cente
rline.
It is importan
t to use at le
ast one woo
d
screw mou
nted firmly
in a stud to s
upport the w
eight
of the micro
wave. Mar
k two additio
nal, evenly sp
aced
locations for
the supplie
d toggle bolt
s.
3. Drill holes
in the mark
ed locations
. Where the
re is
a stud, dr
ill a 3/16" ho
le for wood sc
rews. For holes
that do n
ot line up w
ith a stud,
drill 5/8" ho
les for
toggle bol
ts.
DO NOT IN
STALL THE
MOUNTING
PLATE
AT THIS TIM
E.
4. Remove
the template
from the rea
r wall.
5. Review
the Installatio
n Instructio
n book for y
our
installatio
n situation.
Locate an
d mark holes to
align with h
oles in the
mounting p
late.
IMPORTA
NT:
LOCATE
AT LEAST
ONE STU
D ON EITH
ER SIDE O
F
THE CENTE
RLINE.
MARK TH
E LOCATION FOR
2 ADDITIO
NAL, EVE
NLY
SPACED
TOGGLE B
OLTS IN T
HE MO
UNTING PLA
TE
AREA.
Locate and
mark hol
es to align w
ith holes in
the
mounting plate
.
IMPORT
ANT:
LOCATE A
T LEAST
ONE STU
D ON EITH
ER SIDE
OF
THE CENTER
LINE.
MARK TH
E LOCATIO
N FOR 2 AD
DITIONAL
, EVENLY
SPACED TO
GGLE BO
LTS IN THE
MOUNTIN
G PLATE
AREA.
Trim the rea
r wall templa
te along the
dotted
line.
Trim the rea
r wall templa
te along
the dotted
line.
12"
4"
Darle vuelta
a la hoja par
a consultar
la
versión en E
spañol.
1. Read the instructions on the Mounting Plate/Rear Wall template.
2. Tape the Mounting Plate/Template to the rear wall, aligning it with the holes
previously drilled for holes A and B in the mounting plate.
3. Cut the opening, following the instructions on the Rear Wall template.
REMOVE THE BLOWER PLATE
1. Remove and save the screw(s) fastening the blower plate to the microwave.
2. Lift off the blower plate.
16
ENGLISH