4 countertop cutout, As an alternative you – Thermador Professional Series Gas Rangetop Installation Instructions Manuel d'utilisation
Page 11
Countertop cutout
en-us
11
Countertop cutout
4 Countertop cutout
Countertop cutout
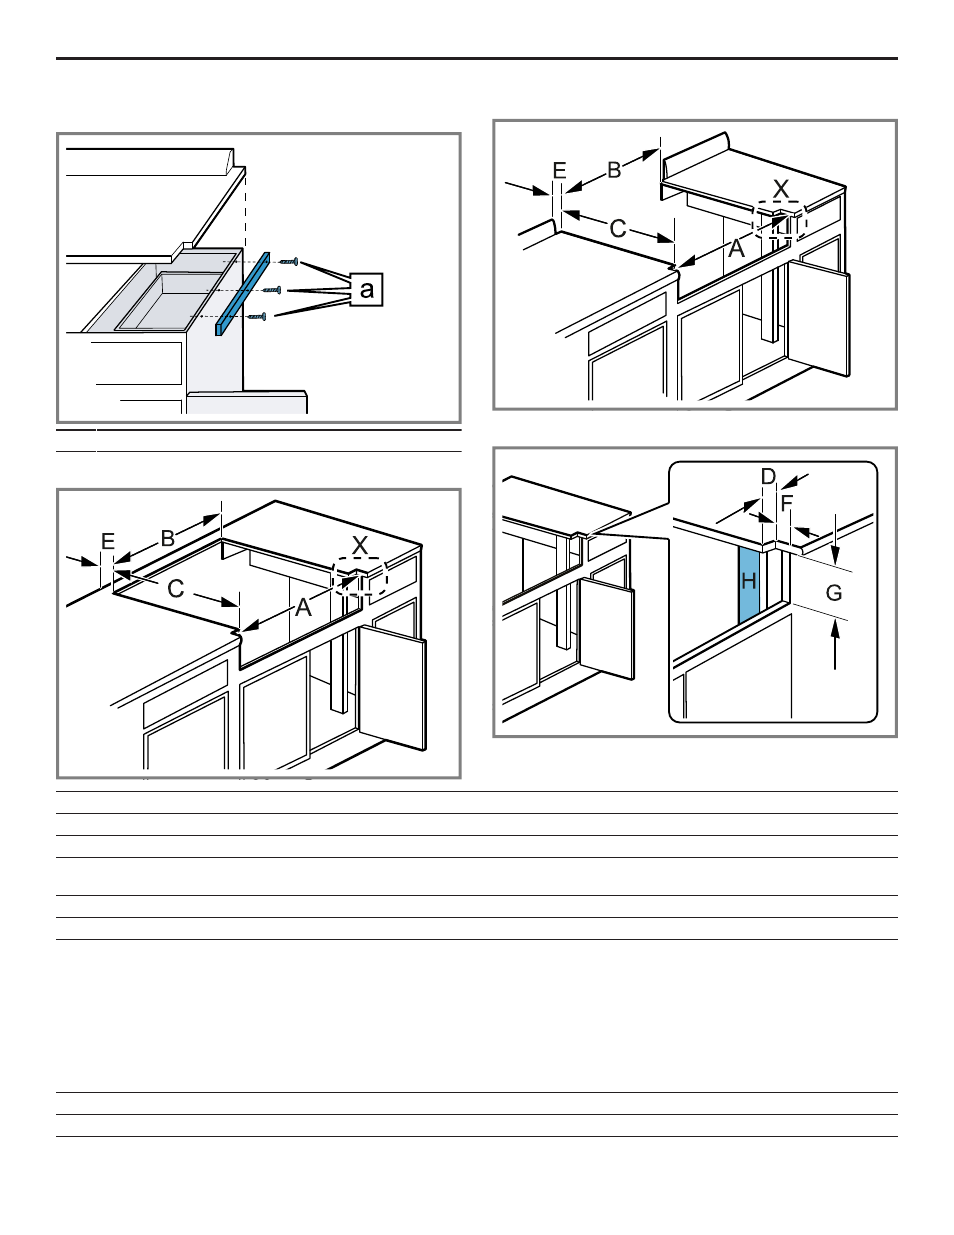
Installing side support cleats (both sides)
a
Counter sunk screws
Island installation without countertop backsplash
Wall installation with countertop backsplash
Detail X: Corner notch detail at front face of cabinet
30" Rangetop
36" Rangetop
48" Rangetop
A
29¹⁵⁄₁₆" (760 mm)
35¹⁵⁄₁₆" (913 mm)
47¹⁵⁄₁₆" (1,218 mm)
B
29⅛" (740 mm)
35⅛" (892 mm)
46¼" (1,175 mm)
C
Island installation: 22¹³⁄₁₆" (580 mm)
Wall installation: 23⁵⁄₁₆" (592 mm)
Island installation: 22¹³⁄₁₆" (580 mm)
Wall installation: 23⁵⁄₁₆" (592 mm)
Island installation: 22¹³⁄₁₆" (580 mm)
Wall installation: 23⁵⁄₁₆" (592 mm)
D
⅜" (10 mm)
⅜" (10 mm)
⅞" (22 mm)
E
min. ¾" (19 mm)
min. ¾" (19 mm)
min. ¾" (19 mm)
F
Corner notch:
¡
0" (0 mm): Control panel project-
ing 1½" (38 mm) from base cabi-
net face.
¡
¹¹⁄₁₆" (18 mm): Required for stan-
dard 24" (610 mm) deep base
cabinet; Control panel projecting
¹³⁄₁₆" (20 mm) from base cabinet
face.
See column 30" rangetop
See column 30" rangetop
G
7¹¹⁄₁₆" (195 mm)
7¹¹⁄₁₆" (195 mm)
7¹¹⁄₁₆" (195 mm)
H
2x4 corner support
2x4 corner support
2x4 corner support