English – Pit Boss 64 Inch Freestanding Wood Pellet Grill Owners Manual Manuel d'utilisation
Page 8
ENGLISH
8
UNDERSTANDING THE PROBES
•
TEMPERATURE PROBE
Located inside the main barrel, on the left side wall, is the temperature probe. It is a small, vertical piece of stainless steel. The
temperature probe measures the internal temperature of the unit. When the temperature is adjusted on the Control Board, the
temperature probe will read the actual temperature inside the unit and adjust to the desired temperature.
IMPORTANT: The temperature of your unit is highly affected by ambient outdoor weather, quality of pellets used,
flavor of pellets, and the quantity of food being cooked.
•
MEAT PROBE
The meat probe measures the internal temperature of your meat in the grill, similar to your indoor oven. Plug-in the meat
probe adapter to the meat probe connection port on the Control Board and insert the stainless steel meat probe into the
thickest portion of your meat and the temperature will be displayed on the control board.
To ensure the meat probe is
connected properly to the connection port, feel and hear it snap into place.
NOTE: When placing the meat probe into your meat, ensure the meat probe and meat probe wires avoid direct
contact with flame or excess heat. This can result in damage to your meat probe. Run the excess wire out the hole
located on the left side of the main grill or the top of the main grill (near the grill lid hinge). When not in use,
disconnect from the meat probe connection port and place aside to keep protected and clean.
UNDERSTANDING THE "P" SETTING
When the recessed "P" SET button is pushed, the “P” setting displayed on the LCD
screen will flash and change to the next value (upward). Once P7 is reached, it will
restart at P0. There are eight “P” settings, ranging from P0 to P7. The recessed "P" SET
button can be pushed using a thin-tipped object.
IMPORTANT: Do not push the "P" SET button too hard, as this may cause
damage. Only a light push is needed.
•
USING THE "P" SETTING IN SMOKE MODE
Anytime the temperature dial is set to SMOKE, such as the start-up cycle, the
auger will run on more of a manual mode of cooking versus using one of the
preset dial temperatures. First, the auger will continuously turn and feed pellets
for four minutes. After four minutes, the auger begins to run a feed cycle based
on the "P' setting selected on the Digital Control Board. The default setting is P4.
HOPPER PRIMING PROCEDURE
These instructions should be followed the first time the grill is ignited, and each time the grill runs out of pellets in the hopper. The
auger must be primed to allow pellets to travel through the length of the auger, and fill the fire pot.
If not primed, the igniter
will timeout before the pellets are ignited, and no fire will start.
Follow these steps to prime the hopper:
1. Open the hopper lid. Make sure there are no foreign objects in the hopper or blocking the auger feed system at the bottom.
2. Remove all cooking components from the interior of the grill. Locate the fire pot in the bottom of the main barrel.
3. Plug the power cord into a power source. Press the
Power Button
to turn the unit on, and turn the
Temperature
Control Dial
to the SMOKE position. Check the following items:
• That you can hear the auger turning. Place your hand above the fire pot and feel for air movement. Do not place your
hand or fingers inside the fire pot. This can cause injury.
• After approximately a minute, you should smell the igniter burning and begin to feel the air getting warmer in the
fire pot. The igniter tip does not glow red, but gets extremely hot and will burn. Do not touch the igniter.
4. Once verified that all electric components are working correctly, press the
Power Button
to turn the unit off.
5. Fill the hopper with all natural barbecue wood pellets.
6. Press the
Power Button
to turn the unit on. Keep the
Temperature Control Dial
in the SMOKE position. Press and hold
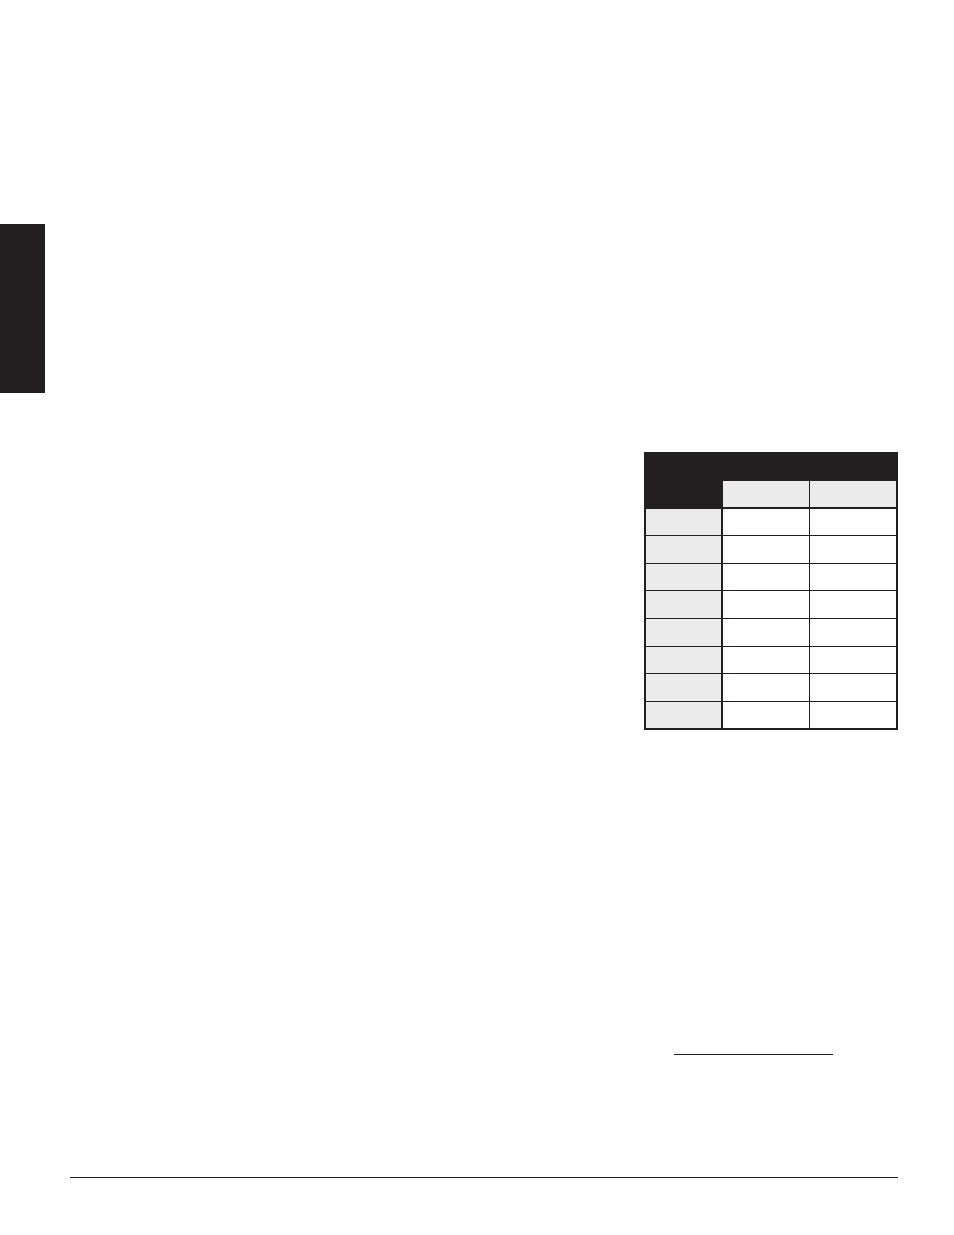
AUGER CYCLE (seconds)
"P" SET
ON
OFF
P0
18
55
P1
18
70
P2
18
85
P3
18
100
*P4
18
115
P5
18
130
P6
18
140
P7
18
150
*
Factory default setting