Installation instructions, Using the installation template, At least 24 – Danby 24 Inch Over-The-Range Microwave Oven Installation Guide Manuel d'utilisation
Page 8
INSTALLATION INSTRUCTIONS
At least 24
.&87287)25+25,=217$/
2876,'((;+$867
72('*(
5($5:$//7(03/$7(
0,1,080:,'7+5(48,5('
&$87,21,)(;+$867$'$3725,6326,7,21('2876,'(
&87+2/(7+528*+5($5:$//)25(;+$867$'$3725
5(&200(1'('',0(16,21ˈ*5($6(/$'(1$,5:,//
',6&+$5*(,172+286(6758&785(
IN THE INSTALLATION INSTRUCTI
O
N
N
S
S
N
REA
OT
D
E
:I
A
T
N
I
D
S
F
V
O
E
L
R
L
Y
O
IM
W
P
T
O
H
R
E
T
D
A
I
N
RE
T
C
T
T
O
IO
BEFORE PROCEEDING WITH THIS
REAR WALL TEMPLATE.
let.
This Rear Wall Template serves to position the bottom
ut
1
a
m
.
cc
o
Us
u
e
r
a
unting
a
t
el
lev
y
p
.
el
late
to
an
che
d t
c
o
k
th
loc
a
a
t
te
the
th
e
te
h
m
o
p
riz
late
o
i
ntal
s
p
e
osi
xha
tion
ust
e
d
o
o
2
f
.
Locate and mark at least one stud on the left or right side
the centerline.
IMPROTANT:
m
Loc
o
ate
unting
an
d
p
m
late
a
.
rk holes to align with holes in the
THE CENTERLINE.
LOCATE AT LEAST ONE STUD ON EITHER SIDE OF
MARK THE LOCATION FOR 2 ADDITIONAL, EVENLY
SP
AR
A
EA.
CED TOGGLE BOLTS IN THE MOUNTING PLATE
A
C
B
Trim the rear wall template along the dotted line.
6"
1
.&87287)25+25,=217$/
2876,'((;+$867
72('*(
5($5:$//7(03/$7(
0,1,080:,'7+5(48,5('
&$87,21,)(;+$867$'$3725,6326,7,21('2876,'(
5(&200(1'('',0(16,21ˈ*5($6(/$'(1$,5:,//
&87+2/(7+528*+5($5:$//)25(;+$867$'$3725
',6&+$5*(,172+286(6758&785(
N
REA
OT
D
E
:I
A
T
N
I
D
S
F
V
O
E
L
R
L
Y
O
IM
W
P
T
O
H
R
E
T
D
A
I
N
RE
T
C
T
T
O
IO
IN THE INSTALLATION INSTRUCTI
O
N
N
S
S
BEFORE PROCEEDING WITH THIS
REAR WALL TEMPLATE.
let.
This Rear Wall Template serves to position the bottom
ut
1
a
m
.
cc
U
o
s
u
e
r
a
unting
a
t
el
lev
y
p
.
el
late
to
an
che
d t
c
o
k
th
loc
a
a
t
te
the
th
e
te
h
m
o
p
riz
late
o
i
ntal
s p
e
osi
xha
tion
ust
e
d
o
o
2
f
.
Lo
the
c
a
c
t
e
e a
nter
nd
li
m
ne
a
.
rk at least one stud on the left or right side
IMPROTANT:
m
Loc
o
ate
unting
an
d
p
m
late
a
.
rk holes to align with holes in the
THE CENTERLINE.
LOCATE AT LEAST ONE STUD ON EITHER SIDE OF
MARK THE LOCATION FOR 2 ADDITIONAL, EVENLY
SP
AR
A
EA.
CED TOGGLE BOLTS IN THE MOUNTING PLATE
A
C
B
Trim the rear wall template along the dotted line.
6"
2
.&87287)25+25,=217$/
2876,'((;+$867
72('*(
5($5:$//7(03/$7(
0,1,080:,'7+5(48,5('
&$87,21,)(;+$867$'$3725,6326,7,21('2876,'(
5(&200(1'('',0(16,21ˈ*5($6(/$'(1$,5:,//
&87+2/(7+528*+5($5:$//)25(;+$867$'$3725
',6&+$5*(,172+286(6758&785(
N
REA
OT
D
E
:I
A
T
N
I
D
S
F
V
O
E
L
R
L
Y
O
IM
W
P
T
O
H
R
E
T
D
A
I
N
RE
T
C
T
T
O
IO
IN THE INSTALLATION INSTRUCTI
O
N
N
S
S
BEFORE PROCEEDING WITH THIS
REAR WALL TEMPLATE.
let.
This Rear Wall Template serves to position the bottom
ut
1
a
m
.
cc
o
Us
u
e
r
a
unting
a
t
el
lev
y
p
.
el
late
to
an
che
d t
c
o
k
th
loc
a
a
t
te
the
th
e
te
h
m
o
p
riz
late
o
i
ntal
s p
e
osi
xha
tion
ust
e
d
o
o
2
f
.
Locate and mark at least one stud on the left or right side
the centerline.
IMPROTANT:
m
Loc
o
ate
unting
an
d
p
m
late
a
.
rk holes to align with holes in the
THE CENTERLINE.
LOCATE AT LEAST ONE STUD ON EITHER SIDE OF
MARK THE LOCATION FOR 2 ADDITIONAL, EVENLY
SP
AR
A
EA.
CED TOGGLE BOLTS IN THE MOUNTING PLATE
A
C
B
Trim the rear wall template along the dotted line.
6"
3
.&87287)25+25,=217$/
2876,'((;+$867
72('*(
5(&200(1'('',0(16,21ˈ*5($6(/$'(1$,5:,//
',6&+$5*(,172+286(6758&785(
5($5:$//7(03/$7(
&$87,21,)(;+$867$'$3725,6326,7,21('2876,'(
&87+2/(7+528*+5($5:$//)25(;+$867$'$3725
N
RE
O
A
T
D
E
:I
A
T
N
I
D
S
F
V
O
E
L
R
L
Y
O
IM
W
P
T
O
H
R
E
T
D
A
I
N
RE
T
C
T
T
O
IO
IN THE INSTALLATION INSTRUCTI
O
N
N
S
S
BEFORE PROCEEDING WITH THIS
REAR WALL TEMPLATE.
let.
This Rear Wall Template serves to position the bottom
ut
1
a
m
.
cc
U
o
s
u
e
r
a
unting
a
t
el
lev
y.
plat
el
e
to
an
che
d t
c
o
k
th
loc
a
a
t
te
the
th
e
te
h
m
o
p
riz
late
o
i
ntal
s p
e
osi
xha
tion
ust
e
d
o
o
2
f
.
Lo
the
c
a
c
t
e
e a
nter
nd
li
m
ne
a
.
rk at least one stud on the left or right side
IMPROTANT:
m
Loc
o
ate
unting
an
d
plat
m
e
a
.
rk holes to align with holes in the
THE CENTERLINE.
LOCATE AT LEAST ONE STUD ON EITHER SIDE OF
MARK THE LOCATION FOR 2 ADDITIONAL, EVENLY
SP
ARE
A
A.
CED TOGGLE BOLTS IN THE MOUNTING PLATE
A
B
Trim the rear wall template along the dotted line.
0,1,080:,'7+5(48,5('
C
6"
4
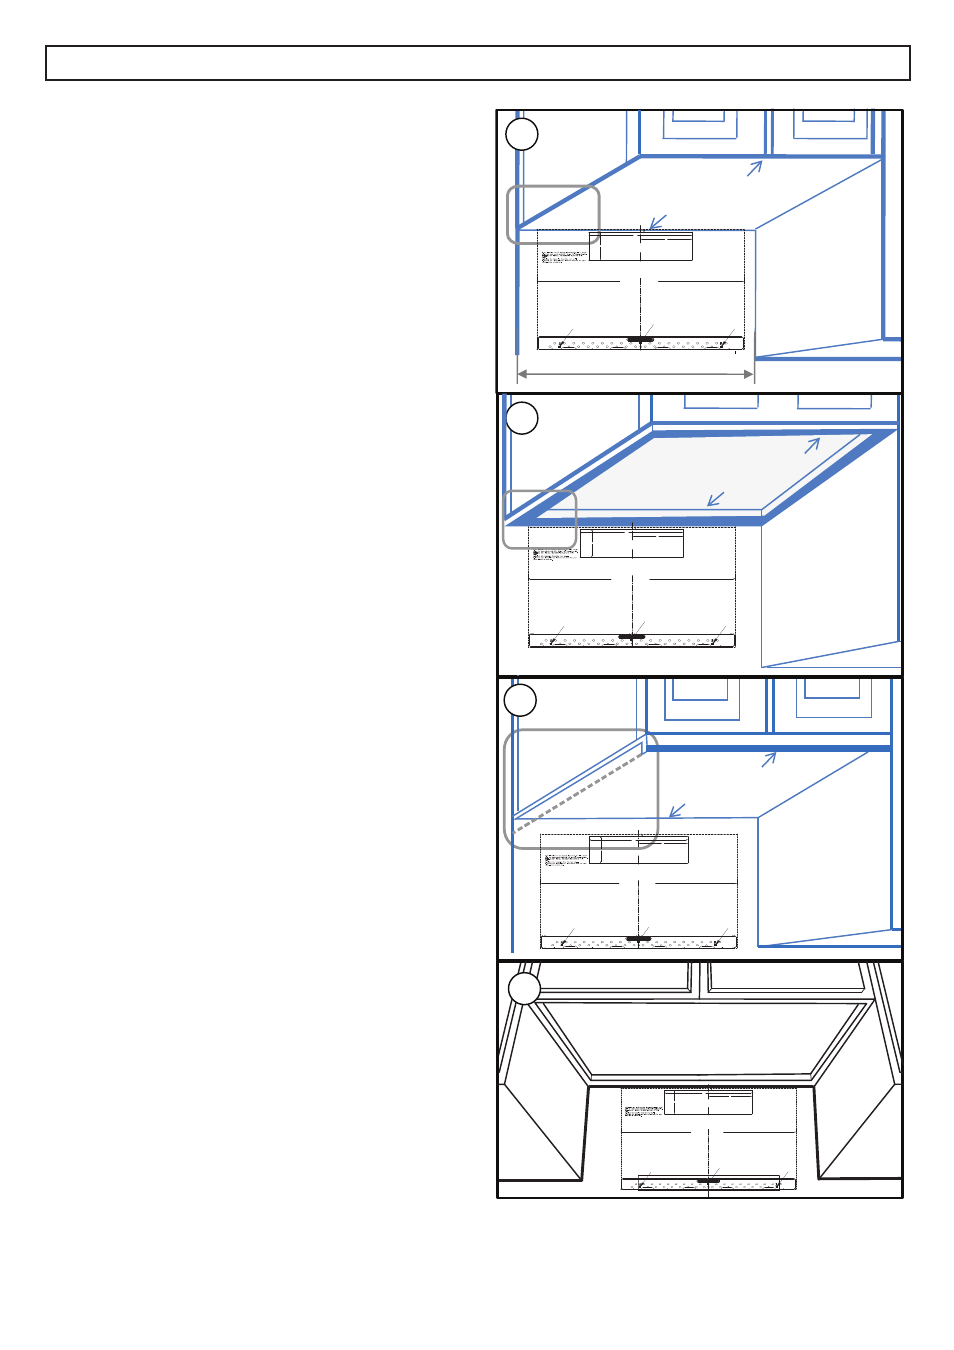
USING THE INSTALLATION TEMPLATE
There are three different types of cabinetry that will
change how the rear wall template should be used
to determine where to install the mounting bracket.
1. Flat bottomed cabinet
: The top of the template
should align with the bottom of the cabinet.
2. Framed recessed cabinet
: The top of the
template should align with the back frame of the
cabinet bottom.
3. Framed recessed bottom cabinet with front
overhang:
The top of the template should align
with the front overhang. It may be helpful to
measure the overhang, then measure the same
distance from the bottom of the cabinet and
mark that spot.
4. Aligning the center line of the rear wall
template:
Measure the space where the
microwave will be installed and fi nd the center
line. Mark this line with a pencil and straight
edge. Align the center line of the template with
the center line on the wall.
7