Esp añol esp añol, Instalación de los componentes del asador de fuego – Louisiana Grills Black Label Series 57 Inch Freestanding Smart Wood Pellet Grill Assembly Guide Manuel d'utilisation
Page 18
LOUISIANA GRILLS
18
ESP
AÑOL
ESP
AÑOL
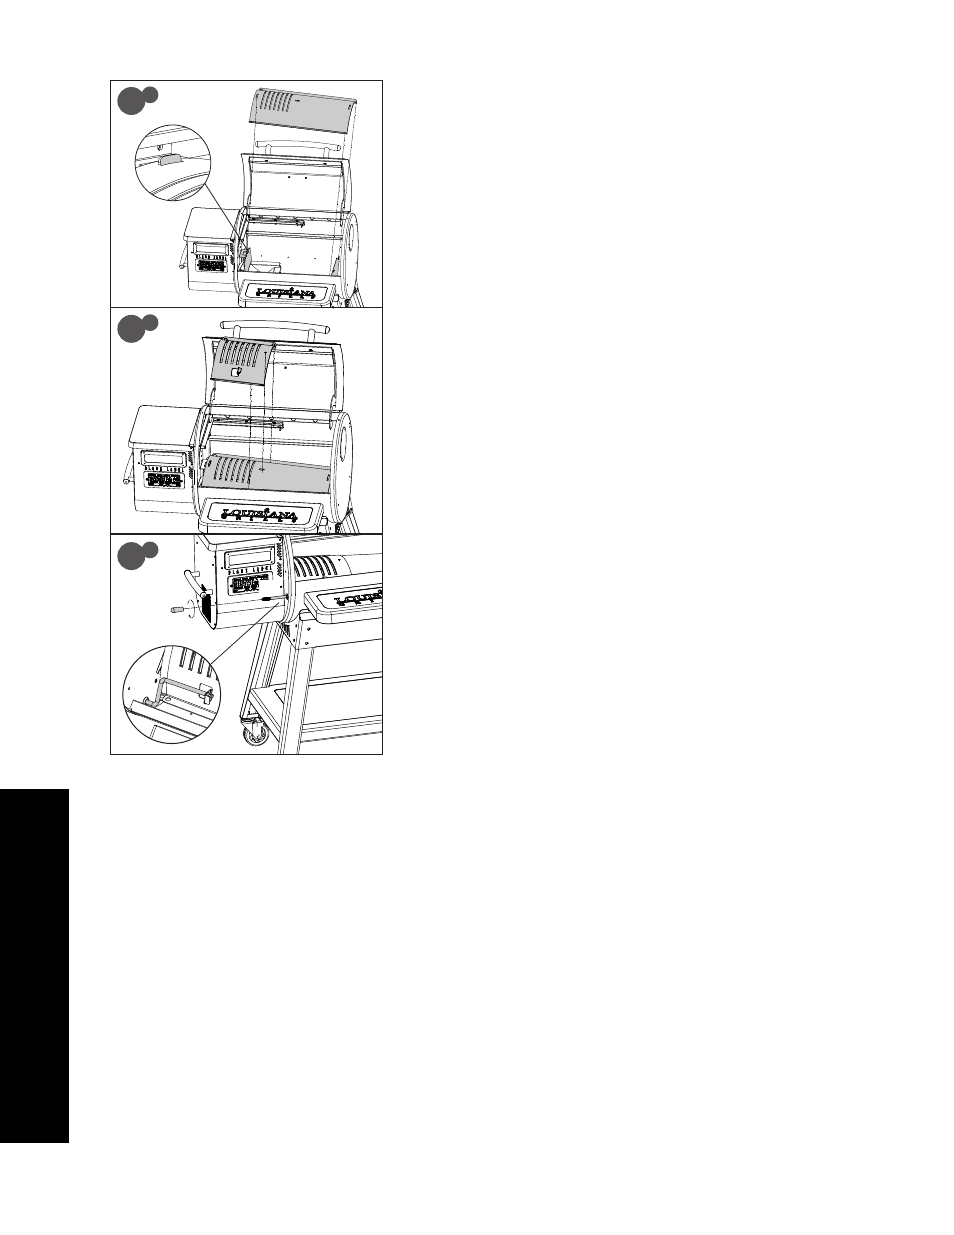
Insert the Flame Broiler Adjusting Bar through the opening
hole on the left side of the Main Barrel. Add the Flame Broiler
Adjusting Bar Handle on the end outside the Barrel. Next,
slide the notched end of the Adjusting Bar into the locking tab
on the Flame Broiler Slider, giving you adjustable access to
the Flame Broiler Slider on the Main Plate. Note illustration.
INSTALACIÓN DE LOS COMPONENTES
DEL ASADOR DE FUEGO
PIEZAS NECESARIAS:
1
x
Guía del asador a la llama (#3)
1
x
Placa principal del asador a la llama (#4)
1
x
Manija de la barra de ajuste del asador de fuego (#10)
1
x
Barra de ajuste del asador de fuego (#11)
INSTALACIÓN:
NOTA: ALGUNOS DE LOS COMPONENTES PARA COCINAR PUEDEN TENER UNA
FINA CAPA DE ACEITE PARA EVITAR LA CORROSIÓN DURANTE EL ENVÍO.
•
Inserte la placa principal de la asador de fuego en el tambor de la parrilla.
Deje la placa principal del asador de fuego sobre el anaquel integrado,
primero el lado derecho, del tambor principal que dirige la grasa hacia el
cubo de grasa. Deslice toda la pieza hasta la izquierda y la placa principal
encajará en la pestaña elevada por encima de la rejilla de quemado. Consulte
la ilustración 8A.
IMPORTANTE: SI LA PLACA PRINCIPAL SE APOYA EN LA BASE DEL TAMBOR,
ES QUE ESTÁ MAL INSTALADA. LA PLACA PRINCIPAL DEL ASADOR DE FUEGO
SE UTILIZA PARA DISTRIBUIR EL CALOR DE FORMA UNIFORME. UNA MALA
INSTALACIÓN DE ESTA PIEZA PUEDE PROVOCAR DAÑOS EN EL TAMBOR
PRINCIPAL DE LA PARRILLA.
•
Coloque el deslizador del asador de fuego sobre la placa principal del asador
de fuego. Asegúrese de que el pasador de anclaje pequeño del lado derecho
del deslizador del asador de fuego se introduzca en el pequeño orificio para el
pasador de la placa principal del asador de fuego. Consulte la ilustración 8B.
cooking. Note illustration
openings. Ensure the raised tab is on the left, to easily adjust for direct or indirect flame when
Place the flame broiler slider on top of the flame broiler main plate, covering the slotted
grate. Note illustration . The flame broiler main plate is used to distribute the heat evenly.
Slide the entire piece to the left side, and the tray will lock into the raised tab above the burn
built-in ledge, right side first, of the main grill that directs grease towards the grease bucket.
Insert the flame broiler main plate into the grill barrel. Rest the flame broiler main plate on the
NOTE: Both flame broiler parts are lightly coated with oil to avoid rusting when shipped.
1x Porcelain-Coated Steel Upper Cooking Rack (#17)
2x Porcelain-Coated Cast-Iron Cooking Grids (#16)
1x Smoke Adjusting Bar (#15)
1x Smoke Adjusting Bar Knob (#14)
1x Flame Broiler Main Plate (#13)
1x Flame Broiler Slider (#12)
8.INSTALLING THE COOKING COMPONENTS
(#4)
Insert the Flame Broiler Adjusting Bar through the opening
hole on the left side of the Main Barrel. Add the Flame Broiler
Adjusting Bar Handle on the end outside the Barrel. Next,
slide the notched end of the Adjusting Bar into the locking tab
on the Flame Broiler Slider, giving you adjustable access to
the Flame Broiler Slider on the Main Plate. Note illustration.
•
Desmonte la manija de la barra de ajuste del asador desenroscándola. Inserte
la barra a través del orificio en la parte izquierda del tambor principal. Vuelva a
colocar la manija de la barra en el extremo que sobresale del tambor principal.
A continuación, deslice el extremo de la barra con una muesca en la pestaña
de bloqueo de la guía del asador; esto le permite acceder a la guía de la parrilla
de la placa principal para ajustarla. Consulte los pasos en la ilustración 8C.
NOTA: CUANDO EL DESLIZADOR DEL ASADOR DE FUEGO ESTÁ ABIERTO, Y COCINA
CON LLAMA DIRECTA, NO DESCUIDE LA PARRILLA EN NINGÚN MOMENTO.
8
A
8
B
8
C
4
3
4
10
11