MAAX APEX 96 8 FT Manuel d'utilisation
Page 5
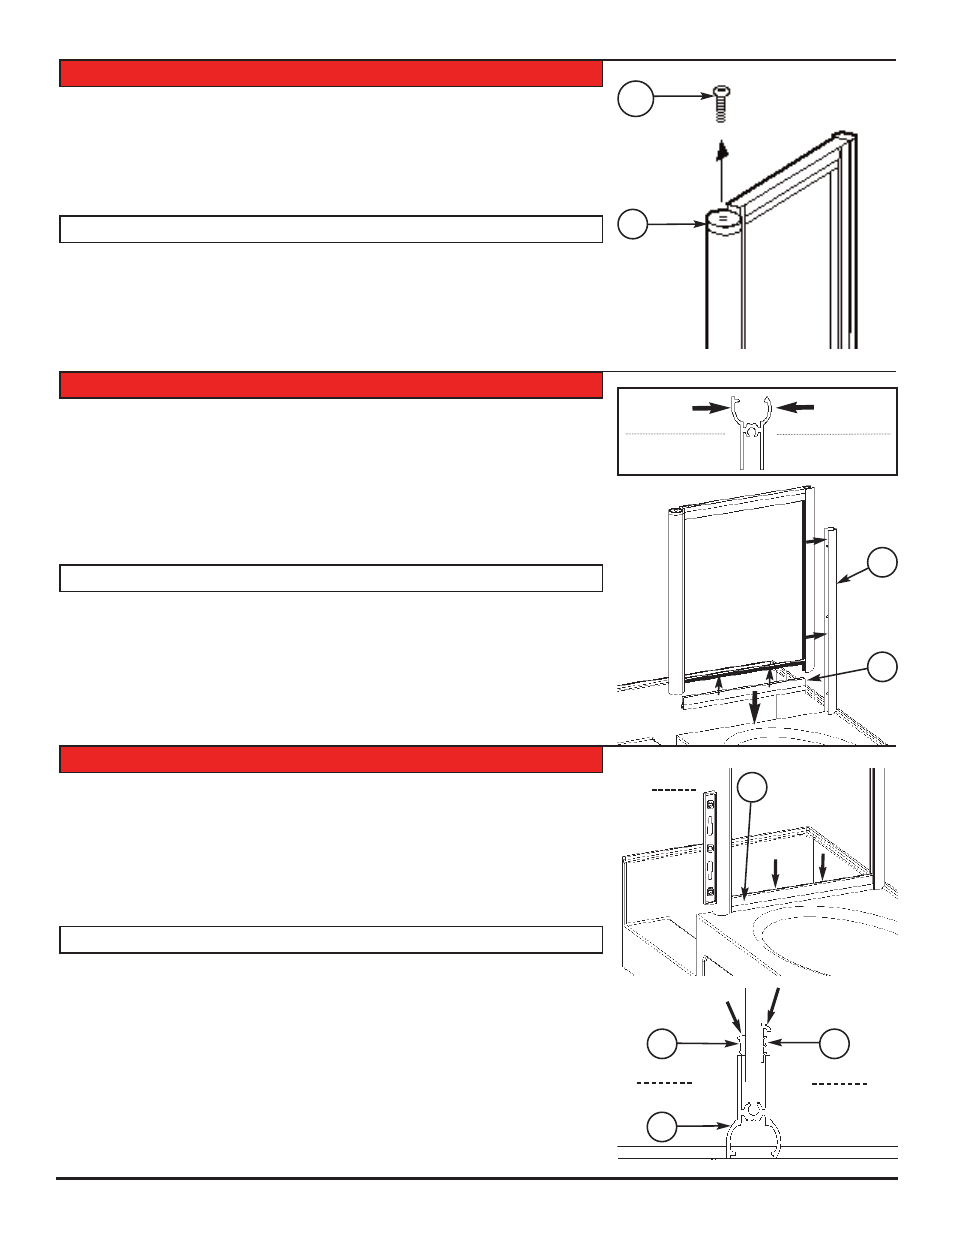
Remove the screw (CC) on the lock bottom (L) of the panel.
Note: Always install door last.
Enlevez la vis (CC) du pivot de fixation inférieur (L) du panneau.
N.B.:
Installez toujours la porte en dernier lieu.
a- Place the bottom frame on the panel (the round side towards the exterior of the
shower).
b- Insert panel in wall jamb (A).
Note: Temporarily place the panel in position without securing it to the wall jamb
(A)
a- Placez le cadre du bas sur le panneau (le côté rond vers l’extérieur de la douche).
b- Insérez le panneau dans le montant mural (A).
N.B.:
Placez le panneau de cette façon sans le fixer immédiatement.
a- Push on the side panel for it to rest completely on the bath tub.
b- Level the panel vertically.
c- Fix in place the bottom frame by inserting first the filler (II) from inside the shower.
d- After, insert the spline plug (J) from exterior of the shower.
a- Poussez sur le panneau latéral pour qu’il s’appuie de toute sa longueur sur le bain.
b- Nivelez le panneau latéral verticalement.
c- Fixer en place le cadre du bas en insérant d’abord la garniture d’étanchéité (II) de
l’intérieur de la douche.
d- Insérez ensuite le joint d’étanchéité (J) de l’extérieur de la douche.
STEP 3 - PANEL
ÉTAPE 3 - PANNEAU
ÉTAPE 5.1 - INSTALLATION DU PANNEAU LATÉRAL
STEP 5.1 - SIDE PANEL INSTALLATION
ÉTAPE 4 - INSTALLATION DU PANNEAU LATÉRAL
STEP 4 - SIDE PANEL INSTALLATION
Interior
Intérieur
5
L
Round side Exterior
Côté arrondi Extérieur
Flat side Interior
Côté plat Intérieur
A
CC
B
II
J
B
B
Exterior
Extérieur
Level
Niveau